Monday, February 29, 2016

I Made it Monday Birthday College Care Package

I Made it Monday

Join me on my ongoing quest to share tips, tricks, projects, and recipes along with just about anything else on I Made it Monday.

Birthday College Care Package


A few weeks ago I shared the Valentine’s Day College Care Package that I sent my oldest daughter.

This week I’m sharing the Birthday College Care Package that we sent her just 10 days later for her 21st birthday.

This time we were really trying to put something together for her to open on her actual birthday. This was her first birthday away from home and it was a big one, 21! Although her dad and I did send her a gift that she already opened, this package was meant to hold her sisters’ gifts for her as well as a little birthday fun as well.

Here’s what I did.

First, I lined the inside of the box that everything was going in with wrapping paper.

This is the first box that I lined. It turned out to not be big enough so I lined a bigger box. Nothing like doing something twice because you didn't think it all the way through the first time.

Inside we put …

Her younger sister’s gift for her, a Fujifilm Instax Mini 8 Instant Film Camera and Film


They have always been very generous when buying gifts for one another.

Her youngest sister’s gifts for her. 3 squishimal dinosaurs from the party section at Target and a pack of Amibo cards for the video game that they play together. 

My two younger daughters had a fun time thinking of names for the dinosaurs, ‘Roar’y, Ger’rawr’d, and ‘Claw’dia.


Five cans of Silly String. She’s a college kid. College kids=silly string. 

What you can't see is that her boyfriend is nearby and is about to be shot with silly string.

Party Blowers

A Party Hat

A Princess Crown, for when the party hat starts to get in the way.

A 21st birthday wine glass that I personalized for her with vinyl. I found the glasses here. I liked these the best because they’re polycarbonate, so they won’t break easily, and they offered a large surface area for me to work with when decorating them. I will confess, in my mind she is filling it with apple juice or water. Nothing more. Hey, a Mom can dream.


A small mylar balloon on a stick. I had to remove the stick and tuck it in the box separate but every girl needs a balloon on her birthday. Mom wasn’t about to disappoint.


And finally, Happy Birthday confetti. Everywhere. Inside everything. So much so, that when she went to the post office to pick up the package the attendant told her there was confetti falling out of the box. That’s worth at least 5 Mom points, right?

Thankfully we were all able to be home at the same time so that we could video chat with her when she opened her box. Almost like it was scripted, she shot silly string at her boyfriend when he came in the room and decided that the dinosaurs will reside in the living room so her and her roommates can “play” with them. There’s no telling what those dinos are going to be doing. Probably not much studying.


If you have more care package ideas that are fun, simple, and won’t break the bank, please share. With two kids in two different colleges next year I’ll take all the suggestions I can get.

Be sure to follow me on Pinterest, as well as Facebook, and find my designs at Applique Time. Check back next week to see my next I Made it Monday post. 

Regards,Bridgette
 

Monday, February 22, 2016

I Made it Monday Removable Throw Pillow Covers

I Made it Monday
Join me on my ongoing quest to share tips, tricks, projects, and recipes along with just about anything else on I Made it Monday.


Removable Throw Pillow Covers
I have wanted to make throw pillows for my couch for ages. I made some Christmas pillows a long, long time ago with polyfil stuffing but I wasn’t very happy with their durability. The polyfil clumped and the pillows collapsed over time. The truth is, I don’t just want one set of throw pillows. I want throw pillows for every holiday and every season. I want to change them out regularly but also have some that “belong there” when it isn’t a holiday or I’m not decorating for a season. The problem with this is that terrible phrase that so many of us struggle with … where will I store them? Seriously, if I have 3 or 4 pillows for every holiday, season or celebration I’m going to need a closet just for pillows. Considering that I already need a closet just for fabric, and could use one just for other craft supplies, means a dedicated pillow closet really isn’t in my cards. That’s where today’s project comes in. I’ve decided to make removable covers so I can switch them out whenever I want, they won’t take more than a small bit of shelf space to store and they have an added bonus: they can be washed whenever needed.

Supplies
  • Pillow forms. I got mine at IKEA for $3.99 each.
  • 1 ½ yards of 54” home décor fabric of choice to make 2 twenty inch square pillow covers.
  • Basic sewing supplies, machine, needle, thread, scissors, iron, ruler, you know, the basics.


Measure pillows. Mine were labeled 20” x 20” but they were really more like 19 ½” x 19 ½”.


Determine your width and length and cut your fabric. I suggest using the same width measurement as your pillow. I know what you’re thinking, “There’s no seam allowance. It won’t fit.” But it will. It will fit snug and your pillow will look full and plump, not half empty and limp. For the length you are going to double the length of the pillow and add 8”. For me this means my fabric will need to be 19 ½” x 47” (19 ½ + 19 ½ + 8).

It may be easier to cut your fabric by folding it in half. Just take a few minutes to be certain of the orientation of the fabric when cutting it.

Now you should have a rectangle of fabric. On the short ends you will need to fold over 3/8”, iron, then fold it over itself, and iron it again. After you have ironed both ends go ahead and sew the seam down on each end.


I sewed the seam somewhat close to the edge. 

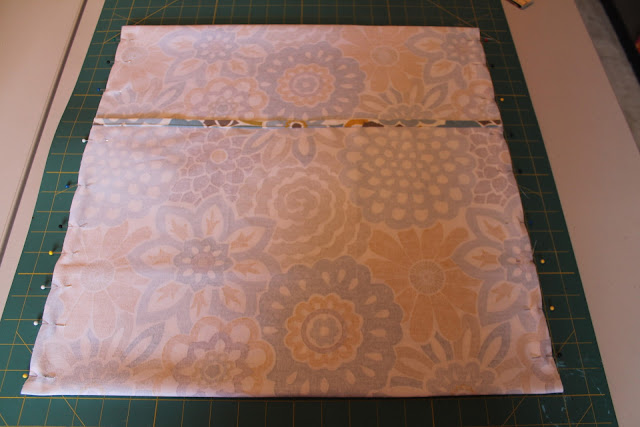
With your fabric right side up, lay it out on a flat surface. I found the center of the long length and folded each short end over so that they overlapped somewhere around 3 inches left or right of center respectively. I then adjusted each end until the sides were 19 ½” just like my top and bottom, trying to keep the overlaps relatively even in relation to the middle. Once you have your sides adjusted, pin them together, then sew the seams.

Overlap the ends and adjust until the sides (shown on the top and bottom in this pic) are the correct length.

Try to keep the overlap relatively even. You can tell that mine is a little longer on one side but not too much. I did say relatively.
Pin the sides then sew.

Trim the corners of your seams to allow for easy turning, then turn the pillow cover right side out. I like to use the tip of a small paint brush to push out the corners. Iron your pillow cover then stuff your pillow form inside and fluff. That’s it. You’re finished!

Trim your corners.

Give it a quick iron then stuff your pillow form inside.

This is what the back of the pillow looks like.

Have you made pillow covers another way? Be sure to share in the comments and when you give these a try I would love to see pics.


Here's a great comparison of how different the couch looks with the new pillows.

Be sure to follow me on Pinterest, as well as Facebook, and find my designs at Applique Time. Check back next week to see my next I Made it Monday post. 
Regards,
Bridgette 

Tuesday, February 16, 2016

I Made it Monday St.Patrick's Day Wreath


I Made it Monday
Join me on my ongoing quest to share tips, tricks, projects, and recipes along with just about anything else on I Made it Monday.

St.Patrick's Day Wreath
Happy Tuesday!  I know, this is I Made it Monday, and I'm posting on Tuesday. Can't I get it together? Well, sometimes life just happens, or science fair project deadlines. Something like that. 

I'm a wreath kinda girl. Seriously. I have a wreath or swag or some other type of hanging decoration for my front door for just about every holiday or event. My husband says I'm going to need another closet just to store them all. He may actually be right although it's not likely I'll make that confession to him. A girl needs her secrets. Lately I've been inspired to update my wreaths or repurpose them like I'm doing today.

A few years ago my youngest daughter had a rainbow themed birthday party. It was beautiful and turned out exactly like I had hoped. You'll have to just trust me on it. I have very few photos and the quality of those that I do have leaves much to be desired. Boy oh boy, did we have fun though. One decoration that I made was a rainbow wreath. I used a wire wreath form and just tied strips of grosgrain ribbon to the form, alternating on the inner and outer rings. Easy, peasy. It was time consuming but super easy to do. I just talked and tied. After the party the wreath stayed up for a week or so then went to hang with the other wreaths on my shelf. Fast forward to now ...

The rainbow wreath before.
This is the backside showing how the grosgrain ribbon is simply tied to the frame.

I bought a shamrock hanging decoration on sale at Joann's the other day for $5. I knew when I saw it that it was the perfect addition to my rainbow wreath to make it a great St. Patrick's Day wreath. The shamrock was getting lost in the ribbon when I put it on top so I used styrofoam to raise it a little off of the ribbon wreath and give it a touch of depth. I punched holes in double 1 inch layers of styrofoam with a paint brush and used craft wire to attach the shamrock to the stryofoam and then to the wreath. It was slightly messy (that happens when you're cutting styrofoam) but super easy since the ribbon wreath was already made.

I was so excited about this working that I forgot to take a picture of the shamrock by itself. 


I used a paint brush to make holes in the styrofoam so I could feed the craft wire through.

This image is from the backside. You can see the styrofoam between the wreath and shamrock peeking out.

I'm not sure what I'm more excited about, the repurposing or the creativity. Either way, I have a great wreath. Do you have a wreath that serves multiple purposes at your house? Be sure to share you ideas in the comments and remember, you can always follow me on Pinterest, as well as Facebook, and find my designs at Applique Time


Look at the sparkle! It is so bright and welcoming on my front door.


Check back next week to see my next I Made it Monday post. I'm going to sew simple throw pillows for the couch with just a few straight lines.

Regards,
Bridgette 

Monday, February 8, 2016

I Made it Monday Valentine's College Care Package

I Made it Monday
Join me on my ongoing quest to share tips, tricks, projects, and recipes along with just about anything else on I Made it Monday.

Valentine’s College Care Package
When I was a kid Valentine’s Day was always an exciting day. It meant my Daddy was going to make a beautifully cheesy stuffed animal and small box of Whitman’s chocolates appear from what seemed like thin air, just for me. One year in particular I specifically remember him reaching for a red stuffed hippo on the top of our avocado green refrigerator. I don’t know about you, but the top of our refrigerator was a sacred space in our house. Reserved only for my Daddy’s wallet and keys and two boxes of cereal at all times, Frosted Flakes and Sugar Crisps, it was magical when something else appeared. It’s funny when I think about it now. If my Daddy, who stood 5’9 ¾” (his words) could easily see the top of the fridge that means we definitely didn’t have a very big refrigerator, yet somehow it seemed to be gigantic to me because only the tallest person I knew, my Daddy, could see the top. Oh, to have the perspective of a child again. 

Anyway … fast forward a few decades and I still think Valentine’s Day is exciting. That’s why when I realized that my oldest daughter would be far from home for the first time this Valentine’s Day I had to come up with a care package for her.
Now, here’s the dilemma. Care packages are a pain. Trying to find things that are needed and wanted and affordable but not so heavy that you need a loan to pay the postage really takes the fun out of making a care package. Throw in a little effort to not send a box full of junk food and candy and it’s nearly impossible. Top it off with a milestone birthday for her just 10 days later and you’re in my shoes. In the end I decided I couldn’t make it completely food or candy free so I tried to be selective. Here’s what I did.

·        A very small box of chocolates (um, it is Valentine’s)
·        A box of Girl Scout Cookies because her little sister is selling them and she’s a college student so $4 for a box of cookies isn’t really in the cards
·        Some cash hidden in a jar of M&M’s because that’s what college care packages are really about
·        A cute XO Target gift card
·        Tea, but only the stuff that came in a red box because there’s a theme here people
·        Some cute paper clips with ribbons tied on them. I know, it’s kinda cheesy but my daughter is a crafty girl like me and I know she will love having them for her most important papers.
·        Flintstone Vitamins (like she had every morning when she was a little girl) because I know they will make her smile. These were disguised as Will You B12 My Valentine vitamins. Cheesy? Yes. Will it make her smile every morning? Yes.


I cut the craft paper to fit and used double sided tape to adhere it to the bottle.

It took a lot longer than it should have to come up with something punny for a bottle of vitamins.

The jar was only $1 at Target. I used a section of a wrapping paper cardboard tube because it was a lot narrower than a paper towel or toilet paper roll.

I used small bills to fill the cardboard tube.

Ribbon makes everything better.
Well, what more could a girl want besides a Target gift card and some cute paper clips?

I also decorated the box by covering the flaps with red craft paper and adding the words Happy Valentine’s Day and some hearts. There’s a cute Minecraft picture that her sister drew for her in the bottom of the box as well. I used my Cameo to cut the cardstock for the words but you could write it or print it on your computer, whatever works for you.


Do you have more care package ideas that are fun, simple, and won’t break the bank? Feel free to share. I’ll have two kids in two different colleges next year. I’ll take all the suggestions I can get.

Be sure to follow me on Pinterest, as well as Facebook, and find my designs at Applique Time. Check back next week to see my next I Made it Monday post. 

Regards,
Bridgette 


Monday, February 1, 2016

I Made it Monday How to Clean Paint Brushes with Murphy's Oil Soap

I Made it Monday


Join me on my ongoing quest to share tips, tricks, projects, and recipes along with just about anything else on I Made it Monday.        
      

Murphy’s Oil Soap to Clean Paint Brushes? Why not?


My daughter painted a self-portrait last weekend to send my Mom. She even cleaned up behind herself. Kinda. The paints are still out because she’s “working on something else” and there is still paint on the table because, well, because there is always paint on the table. But she did clean out the brushes. I even asked. Did you clean the brushes? Yes ma’am. Whoa! Did she just say ma’am without me pulling it out of her? That’s how I know I asked. I specifically remember her answer. Well, I should have asked more questions. I mean, really, I’ve been doing this Mom thing for nearly 21 years now. I know to ask more questions, to clarify, to confirm, to make sure that whatever it is it won’t come back to haunt me. Let’s keep it simple here people. I failed. Thankfully my failure led to an amazing discovery that I will now share with you. Join me as I explain how to make your paint brushes new again.

Do you see my dilemma? The third one from the right was so full of white paint that it felt like there was a pebble in the middle.


Supplies
·        Murphy’s Oil Soap
·        Crusty, dried up, neglected, hard as a rock paint brushes
·        A jar or cup for soaking (I used a mason jar)
·        Fingernail brush or cleaning toothbrush
·        Water
·        Patience

I wonder if there is a way to get that ring out of my window sill that doesn't involve painting?


Before I started I was convinced that the paint brushes were headed for the trash and only went through the effort of trying to clean them so I could say that I had. I really didn’t see any other outcome in the cards and honestly wasn’t even willing to put much effort into trying. They were bad! Rock hard, dried up, felt like there was a rock in the middle of the bristles bad. I gave a quick glance at Pinterest for ideas but I didn’t even bother to read them. That’s how sure I was that these brushes had seen their last canvas. Since I saw a few posts and pics mentioning Murphy’s Oil Soap I decided that would be my halfhearted approach.


The first time I soaked the paint brushes my mixture was approximately 1 part Murphy’s Oil Soap and 3 parts water. You really only need enough liquid to cover the bristles so don’t bother filling the jar as much as I did. Like I said, my heart wasn’t in it so there wasn’t a lot of attention at the beginning. After an overnight soaking I checked the brushes in the morning expecting to find nothing better than I had started with. Boy was I wrong. I rinsed the brushes, gave them a little scrub with my fingernail brush and decided to soak them again with a higher concentrate. It was actually working.

The second time I soaked them in a 1 to 1 mixture. After soaking for the day I rinsed them that night and again, using my fingernail brush, scrubbed at them a little, always in the direction of the bristles. About half of the brushes were completely clean now. And let me be clear, when I say completely clean, I mean there was no paint inside the bristles and the bristles were unbelievably soft. I decided a third soaking was in order for those brushes that hadn’t quite joined the clean team.


The third time I soaked them it was in 100% Murphy’s Oil Soap overnight. The next day I rinsed them and gave them some more love with the fingernail brush and that was it. Viola! They were all clean. And not just clean, but clean and soft and really like new. Better than new even. With their nicks and chips on the handles my brushes looked like they had painted a masterpiece and lived to tell about it. 
I'm serious when I say they are as clean and as soft as they were new.
Have you tried Murphy’s Oil Soap to clean paint brushes or do you have another you won’t believe it approach or use for Murphy's Oil Soap? If so, please share in the comments and check back next week when I will share a slightly cheesy Valentine care package for my oldest daughter that doesn’t contain a lot of junk or candy (it’s harder than you think).

Be sure to follow me on Pinterest, as well as Facebook, and find my designs at Applique Time. Check back next week to see my next I Made it Monday post. 

Regards,
Bridgette 


Arbitrary self-portrait inclusion. She loves her red hair.