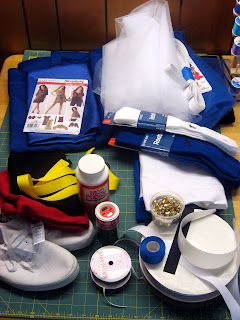
Remember the picture that included all the supplies my daughter and I were going to use for her homecoming spirit week? Well, spirit week has come and gone and here are the pics of what we did. Each day had a different theme. Monday was "Adult Day" for the juniors. She decided to wear her scrubs showing her plans to pursue a career in medicine, specifically physical therapy so no crafting there.
Tuesday was character day. Her and her friends decided to dress as super heroes and for some reason she decided to be Robin, the Boy Wonder. Kinda funny to see that Robin was taller than Batman and Superman this time around. For this costume we used a red t-shirt that I appliqued a black circle onto and then she painted the yellow "R". I made a belt using grosgrain ribbon, purse o rings and velcro. The best part of this costume that she absolutely loved were the shoes. How cool are those? Best of all those were shoes that she discarded just a month ago that we dug out of the yardsale box. We used mod podge and glitter and followed this tutorial and video from Martha Stewart to make them. I'm positive she is going to wear those again.
Wednesday was wacky/tacky day, another non craft day. It is always funny to see how strange some things can look when paired together. And for the record, those are her pants from a dance recital in grade school and an apron that my mom made her when she was only 4. Some things are definitely worth keeping.
Thursday was Medieval Day. She decided to be a jester. Using school colors I cut 2 t-shirts down the middle and sewed them together. I made a woven ribbon headband using this tutorial so she would have the trademark diamonds in her costume and we made a tutu for her with jingle bells attached. We originally planned to make the tutu half and half also but decided that she would be more likely to wear it again for something school spirit related if it wasn't that way. This was finished off with alternating sock colors and a cute little jester/scepter thing that I whipped up that morning. In hindsight we should have used a different color pallet. The school colors looked a little too spirit day which was Friday not Thursday.
Friday was spirit day. We've done this a few times and since she is an athlete at school she has lots of school colored clothing. The bad part is we were kinda rushed that morning and although she promised she would get pics at school all I got was some of her friends with their faces painted. Lesson learned. The best part of this night was that she got to drive herself to the game having successfully passed the driving test Thursday afternoon.
Saturday night was the big dance. The dress was easy to make and of course she looked great in it. I made the mistake of letting her get dressed at her friends house and not getting many pics of her in the dress.
All in all it was a great week. Everything was fairly simple to make and she had a great time. I also have to say that all total we spent less than $80 including the dress pattern and fabric. I'm sure she is already making plans for next year, she will be a senior after all.
Monday, October 24, 2011
Sunday, October 16, 2011
Not Just a Plain Denim Jacket
This year my youngest daughter started Kindergarten. Like many other little girls this was a milestone to be marked with new clothes. I really wanted a denim jacket for her and started looking around in mid July. I'd hoped to find one second hand since I planned to dress it up a little. Unfortunately I wasn't lucky enough for that but I was not discouraged. I picked one up during back to school shopping in August, washed and dried it and hung it in my sewing area waiting for the right spark of inspiration, a.k.a. time. Last night while waiting for my oldest daughter to try on her homecoming dress and before sampling a new design I took it off the hanger and decided to have a go at it. I was surprised at how quickly it went even with taking pics along the way.
After I selected fabric I laid the collar out on paper to trace for a pattern. I traced around 3 sides of the collar and then drew the bottom line in. Next I added a seam allowance to my pattern paper (the dashed line) and cut out the pattern.
 |
| Before |
 |
| Before |
After I selected fabric I laid the collar out on paper to trace for a pattern. I traced around 3 sides of the collar and then drew the bottom line in. Next I added a seam allowance to my pattern paper (the dashed line) and cut out the pattern.
Using the pattern I cut my fabric, pinned the right sides together and sewed them leaving an opening to turn the outside right. Confession Time!!! I know that I should be snipping and trimming the corners so they will turn nice but I rarely do that. Instead I just make a quick trip around the seam allowance with my pinking shears. It's just easier. After that was a quick press with the iron.
Next I pinned the turned and pressed piece to my collar and started sewing it on. Next time I will use more pins to reduce the amount of shifting. There were a few thick spots that I had to use my hump jumper to help things along but overall it was very easy.
 |
| This is what I call a hump jumper. Joann's sells a similar product called a jean-a-ma-jig. It is great for getting over thick spots when the feed dogs won't move the fabric along. Once I finished the collar I moved on to put an applique on the back. I decided to use the flower frame applique available in my shop. The 6x10 size was perfect for the back of the jacket. I did change my needle to a 16 to work with the denim on both my sewing machine and embroidery machine. And here is the finished product ...  How about you? Have you ever "dressed things up a little"? Have plans for something in the future? |
Sunday, October 9, 2011
Homecoming Week with a Crafty Mom
Did you get a good look at the picture? Can you make out anything? Mod Podge, some jingle bells, a pair of shoes maybe? How about all that tulle in the back and the t-shirts? What in the world could I possibly need all of this for? Homecoming Spirit Week of course! Stay tuned to see what my daughter and I come up with and what in the world those jingle bells are for!
Sunday, October 2, 2011
Ric Rac on an applique? How do I attach that?
When I created my ornament with ric rac detail I knew that I should offer some kind of explanation of how to attach it. If this were my first time doing this I would have wondered how to do it. I would have had a few ideas but still I would have been on the internet searching for “how to attach ric rac to an appliqué”. Since I’m sure I wouldn’t be alone with this search query I decided I should probably answer it so here it is … oh, and wish me luck, it’s my first tutorial …
The directions begin on step # 5 of my ornament design however they apply to any scenario where there is a need for an embellishment like ric rac or ribbon.
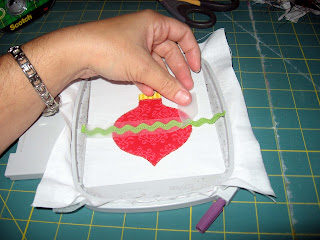
First, run the placement line for the ric rac. I ran it a few times so it would show up in the picture but typically this would be just one quick line.
Next, attach the ric rac or ribbon with tape. That’s right, tape. I use scotch tape, the kind with the green plaid paper insert. You know, the kind that you hide on top of the refrigerator so the kids don’t use it up because it’s the good stuff. Tape the ric rac down making sure that it’s directly centered over the placement line. I don’t use pins because you can only safely pin the ends of the ric rac and must hope that it doesn’t shift. With tape I know that 100% of the length is secured.
Now you’re ready to run the tack down stitch. For my design it runs left and then right.
After you’ve taken a look at your ric rac and decided that you’re pleased it’s time to peel the tape away. The trick to this is to pull the tape at a 90o angle. Separate the tape from the ric rac, turn it up to a 90o angle and slowly pull. Because the tape is essentially perforated by the stitches it pulls away easily as long as you have it at the angle and take your time. If there are any little pieces of tape that don’t come off just carefully use you’re seam ripper to help get the little pieces off.
When you’re ready to trim the ric rac don’t get carried away. I know, you like to cut as close to the tack down line as possible, I do too, but this is one time when leaving a little extra (just a little) will be ok. If you cut it to close it will pull and separate when you run the satin stitch.
After that you’re ready to finish running the satin stitches, trim your threads and viola! A beautifully enhanced appliqué design.
And now you know an easy way to attach ric rac or ribbon to an appliqué. Have fun!
Subscribe to:
Comments (Atom)


