Sunday, January 29, 2012

An Easy Way to Display Artwork

5 year old? Check.
Constant stream of completed worksheets from school? Check.
Seemingly never ending stacks of the finest 5 year old artwork? Check.
A place to display said worksheets and artwork that doesn't involve taping them to a door or hanging them from the fridge? Check, check, check!


Here's how ...


All you need is an inexpensive cafe rod and some drapery rings. I already had a cafe rod on hand but it was white with gold trim. Since black is the new black around my house I spray painted the rod and hanging hardware first. I picked up a few packs of curtain clip rings, slipped them on the rod before I hung it (be sure to use the center support if you are making it super long) and was ready to display our beautiful works of art. Now, each day I just replace the oldest with something new. The display is ever changing, always represents the season or holiday and since ours is in the dining room we have a conversation starter for dinner every night. Plus the entire project cost less than $20. 


Have your own artist and want to make something special for them? Then you need this free painter's palette applique design


If you're the type that reads blogs (psst, that's you) please consider following me. Comments are always welcome too! I would love to hear about the creative ways that you plan to use the design and how you might be using your own artwork display in your home too.


Blessings,
Bridgette


Tuesday, January 17, 2012

Storing and Organizing Board Games and Puzzles

Stuff!  We all have it, some more than others. For most of us the challenge is finding where to put the stuff and I don't mean where to shove it or store it with no hopes of easily getting to it but rather where to put it so that it can still be used for it's intended purpose by those it was intended to be used by. 


With 3 kids we have a lot of stuff but there is one category that we seem to have more than our share of ... puzzles and board games. Every year for many, many years now the girls have received puzzles and board games for Christmas. We also have a habit of buying several large puzzles every summer that the kids work on when it's too hot outside or they just aren't interested in doing anything else. Other than the space they take up while we are working on them there really isn't anything negative about puzzles. That is, until you have to store a bunch of them. Our puzzles and board games lived on the lower shelves of a gigantic bookshelf in the den since we moved in to this house and honestly, it was a site for sore eyes. I was constantly straightening them up after the kids dug through for whatever they were looking for. It was really getting to be a problem so I did what every mom would do ... I bought some baskets. Big baskets. Big enough to get 4 board games in 1 basket. While this was an improvement it still wasn't working for me. Next came the ziploc bags and this my friends is where everything came together. In 1 basket I was able to fit 19 games including 8 board games. As for the puzzles I was able to fit, are you ready for it, really you aren't going to believe this ... 34 puzzles! (Yes, we have more than 34 puzzles.) Here's how I did it ...


First off my baskets are pretty big, 19x10x13, and I bought 4 of them. I didn't really like the fabric liner that was in them so I made new ones but that will have to be a completely different post. Next came the ziploc bags. We have a lot of smaller puzzles, 100 pieces or less. For each puzzle I put the pieces in a quart size bag, cut off the front of the box with the picture, put it in the bag and zipped it up. I used the zip style bags rather than the locking type to make it easier for little hands to close them. For the larger puzzles I used gallon bags and did the same thing ... pieces in, picture cut and in, zzzzzip!  Done! Super easy! The board games weren't any different. The size of the bag depended on how many pieces there were but the concept was the same except instead of the puzzle picture I stuck the instructions in and zzzzzip! Done! What about the boards? Those are all neatly folded and at the back of the basket. Just pick out the bag with the pieces and grab the corresponding board and you're ready to play. Obviously there were a few board games that weren't going to fit in a bag so we still have those in the boxes but that's fine. The amount of space we gained was substantial and it is so much easier for the kids to find what they want, even easier to clean it up when they are finished, and it cost me less than $30 because the baskets were on sale. Think I'm crazy? Try it! You won't believe how easy it is for everyone.


Have you found an easy remedy for a storage issue in your house? If so, please share in the comment section so we can all copy ... um, I mean, be inspired, who am I kidding, I mean copy.  


This basket is 19x10x13.

That's right, 34 puzzles!

19 games including 8 board games. The boards are all folded on the right.


P.S. I keep a quart size bag nearby that has all of the stray pieces. Any puzzle piece or game piece that turns up out of place goes in the bag. If we're looking for a missing piece we have only 1 place to look, in the bag.


Tuesday, January 10, 2012

Adding Ribbon to my Masquerade Mask Applique Design and Easy Carrot


Have you seen my masquerade mask applique design in my etsy shop? How about my simple carrot applique design? If so, you may have wondered how I attached the korker ribbon. The steps are all in the design and it is super easy thanks to my trusty friend, tape. This tutorial works for both designs.


First, you will need korker ribbon. There are a lot of tutorials for how to make korker ribbon online and you can even buy it pre-korked (is that a word?). Basically you need grosgrain ribbon, a dowel, some spray starch, clothes pins and an oven. It's easy, just a little time consuming. I usually do a lot at one time and work with what I have for a while until I need something else. Since this isn't a tutorial for korker ribbon I won't go into the steps but if you don't know how you can check out this ehow article to get the idea. FYI, it doesn't mention spray starch but I like to spray mine down before baking.  


The first 2 steps of the design are for the ribbon. If you don't want the ribbon you can skip these steps and probably don't need this tutorial. The first step is essentially a placement stitch for the ribbon. This shows you where to tape your ribbon down.  If you're wondering I started with 13" strips of ribbon for the masquerade design.  I trimmed a few inches away in the end but it really depends on your intended purpose how long you want the ribbon to be.


Step 2 will go over the placement stitch twice to secure the ribbon. After this remove the tape and trim the excess ribbon if you left a little too much.  


Steps 3 and 4 are the placement and tack for the mask fabric. Step 5 is the placement for the eyes. Depending on what you have in mind you may want to trim the fabric away from the eye holes. To do this I carefully run my trimming scissors so there is a tiny little pucker in the fabric and snip a very small (teeny) opening. Once I have confirmed that I didn't snip through my garment I then use that opening to insert my scissors and trim away.   


After this the design is ready to finish. Step 6 is the satin for the mask. Step 7 is the contrast detail on the satin stitch and step 8 is the eyes. And you're done! Wasn't that easy?


Wednesday, December 28, 2011

3 Girls = 3 Headband Holders

As many of you know I have been blessed with 3 sweet daughters. They all have their own personalities but one thing that is consistent among them all is their long hair and love of headbands. To go with this is a constant need for somewhere to put the headbands. I have considered what to make to store the headbands on for some time now. I have googled it, wandered through stores looking for things to re-purpose and even questioned the good people at Charming Charlie's to see if their displays were available for sale ... honestly this has been on my list for a while. Finally, I decided to combine a few different ideas of things that I have seen in the past and make holders for each of the girls for Christmas.  


Supplies


Wood clock base ... I bought mine from Michaels. They are about 6 1/2 inches in diameter and were less than $5 a piece. They had a hole in the middle although my husband did have to drill a counter sink hole also.


Knob ... This will be for the top. If you have some at home from a previous project use it. It needs to be pretty wide though. Close to the width of the paper towel roll is great. You will need to take it with you to the hardware store to purchase the right width threaded rod. More on that below.  


Threaded metal rod, hollow aluminum rod, nut and washer ... We got ours from the local hardware store. I say "we" because my husband was a big help with this part. I tend to avoid any work that requires tools or supplies that are normally housed in the garage. The aluminum rod was big enough to fit the threaded rod inside. I'm not sure that this is completely necessary but this was the image that my husband had in his mind and since I needed his help I went with it. The threaded rod was the right fit for the knob and the nut and washer fit as well.


A full roll of paper towels ... I use cheap paper towels for cleaning so I took mine from the cleaning supplies. 


Fabric ... mine was about 19" x 17". Just make sure you have enough to go around the paper towel roll and tuck in at the top and bottom.


Batting ... I used some from a pack of crib batting that I have been using for misc. crafts for a while. You will need a piece that is approximately 18" x 11".


Hot glue gun for badly burning your index finger 3 days before Christmas, I mean for securing the fabric and batting.  No sewing necessary.


Spray paint ... if you have a plastic knob be sure to get paint that will adhere to plastic.


Tools ... hack saw or cut off wheel to cut the rods down to size and a drill with a counter sink bit.


First, I spray painted the clock bases and the knobs. It was a very windy day but I was running out of chances to get it done while the kids were at school so I had to deal with it. Yes, those are cans of food from my pantry holding the newspaper down and yes I took this picture with my phone because my daughter decided it would be a good day to fulfill her duties as historian of the Latin Club and actually take pictures so my camera was with her at school.


Next, I covered the paper towel rolls. Each were covered with batting first and then fabric. I ironed a crease in the edge of the fabric and used hot glue to hold it down. Be sure you have enough fabric on each side to cover the top and bottom of the roll and to tuck into the cardboard roll before you hot glue the edge down. No gluing necessary for the batting, it tends to grab onto itself anyway.  


Next I tucked in the edges. I folded the extra back, applied a little hot glue and then started folding and tucking. This was where I burned my finger. I added a little extra glue, folded and tucked only I completely missed the fabric and stuck my finger straight in the glue. If you're going to suggest that I buy a multi-temp gun let me save you the trouble. I have a multi-temp gun but I'm impatient and had it set on high.


After this my paper towel rolls were covered and ready to be assembled but my husband hadn't started on his part yet. This was not his fault though. It was me telling him not to do anything until I could take pictures.  :)


First he drilled a counter sink hole in each base. This was so the nut and washer wouldn't stick out and the base could sit flat.  


Next he cut down the threaded rod and the hollow aluminum rod. Measure for yourself please but ours turned out to be 11 1/2" for the threaded rod and 10 1/2" for the hollow aluminum rod. These measurements could be different for you depending on the thickness of your base and fabric. He then put the threaded rod through and attached the washer and nut making sure that the base sat flat once they were on.  


Next was final assembly. With the covered paper towel roll on we screwed the knobs down tight into the top of the paper towels so that the roll wouldn't shift around and I test fitted a few headbands.  


And that's it. They were ready to go under the tree and ready to take their respective places on each girl's dresser and be filled with even more headbands.  


And now a little celebration is in order. Today I reached 1,000 "likes" on my facebook page for my etsy shop, Applique Time. I am super excited to have reached this milestone and the timing was perfect since the goal I set was to reach 1,000 before the end of the year. Because of this and to say "thank you" to all of my wonderful customers and followers I have included this applique design as a free download here.  


I really do appreciate each of you and hope you enjoy the free design. If you're the kind that follows blogs please consider following me. I promise I won't post so often that you can't keep up.  :)

I wish everyone a prosperous and peaceful 2012!

Bridgette


Thursday, December 1, 2011

A "Newer" Wreath

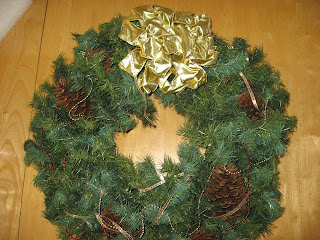
Is it December already?  Did I really post only once in November?  Oops!  That wasn't what I had in mind. Nevertheless, December is upon us now and if you haven't already started decorating for Christmas well ... let's just say I'm not going to judge you.  Last year just decorating the tree seemed like a chore and we didn't get it finished until the 11th of December.  This year is different and somehow (maybe it's the fact that all of the kids are in school now) we seem to be on top of things.  So much so that when my middle daughter brought me the wreath to "fluff" yet again I decided I was going to do something new with it.  You see, this wreath, and all of its trimmings, has been in the family for 12 years now.  Each year my husband unpacks it from the buckets of decorations and lovingly calls to me to give it a little TLC before hanging it on the door.  Some years I even take everything off and completely "redo" it.  Well, not this year!  I took a few minutes (read hours) of my evening Saturday and perused Pinterest for new wreath ideas and decided to add our surname initial to it.  The problem was I didn't have a 12 inch "W" lying around so off to the craft store I went.  Here are the details of how this came together and a before picture ...


Supplies:
a wreath (like I said, this one has been around a while)
sheet of Styrofoam (I purchased mine at Joann's.  It was about an inch thick and probably 11x14)
marker
knife
newspaper
30 gauge wire (or whatever you have around the house as long as it isn't too thick)
glitter (I bought an 8oz bottle and almost used 1/4 of it)
spray paint the same color as the glitter
clear drying school glue (I used almost 2 4oz bottles)
a paint brush (the wider the better)
a bowl to pour the glue into
ribbon or something to hang the wreath

I knew what I wanted my letter "W" to look like.  Being an applique person I am very familiar with lots of fonts especially the curlz font.  I really wanted something with a little whimsy but clear enough to be distinguishable from the road.  Using the marker I drew my "W" on my Styrofoam.  (Did you know Styrofoam is a brand?  Kinda like Q-tip.)  I wasn't worried about getting it perfect because it would be covered anyway.  If you're having trouble picturing your letter just head to your computer and look at a few fonts online.


Next I went outside and cut the letter out using a knife.  I found it easiest to score it first and then go back and cut through.  


I cut 4 long pieces of wire.  I wanted them long enough to wedge into the Styrofoam and have plenty of length to tie the finished letter to the wreath.  I just kinda cut the wire into the foam on each end.  Kinda like it was cutting into it but not through it.  Just wedged in there.  I guess I should have tried a little harder to get a pic of this because describing it isn't coming so easy.

After that I went outside to spray paint my "W" red.  I wanted to do this so in the event that I wasn't generous with my glitter the white wouldn't show through.  The wire did come in handy tying the letter to the volleyball net tie down.  If you look really close and are younger than 40 you might be able to see the wire "wedged" in there.  

This picture brought to you by the letter W.

After the paint dried next came the glitter.  I poured the glue into a small bowl to make it easier to use the paint brush.  I brushed some glue on then generously applied the glitter and just worked my way around a little glue and a lot of glitter at a time.  This took a while because I had to wait for sections to dry so I could turn it around to get to other spots like the sides and top.  I really had to resist the urge to move on while the glue was drying.  


I don't know if it was because I was liberal with the glitter or because of the spray paint but 1 coat of glitter was plenty.  The next morning I did apply a second layer of glue over the glitter.  I wanted the top coat to be glue not glitter and since I was using school glue that dried clear this was no problem.  (You may be able to see the wire here also as well as a complimentary viewing of the Arts section of the Washington Post.)  


After waiting most of the day for the glue to dry I was able to use the attached wire and secure my 12 inch "W" to my wreath that evening and hang it up on the front door.  I am very pleased with the appearance both up close and far away.  I have to admit, there was a time early on in the glittering that I was worried that it might look a little thrown together but once I got a nice layer of glitter on it and put it together I'm very happy with the outcome.    


How about you?  Do you have a great wreath makeover to share?