Showing posts with label spray paint. Show all posts

Monday, January 11, 2016

I Made it Monday My Photo Gallery Wall

I Made it Monday


Early last summer I got a crazy idea to start posting regularly on Monday's at the least. I actually didn't just get the idea then, I had been toying with it for a while. I had big dreams of highlighting all kinds of projects that "I made!" every Monday. Sewing projects, craft projects, recipes, whatever I could think of. Well, around the same time that I made this grand plan we also made a grand plan as a family for my husband to change employers and my family to move over 850 miles and six states away. Well thought out, I know. It's a talent. My desire to regularly post on Monday's quickly went out the window because there isn't much to share when you're living in temporary housing, your entire household is in storage, and you spend your days looking at houses. Well, I guess there is, but it wasn't exactly what I had in mind. As quickly as my plan started it came to a screeching halt. In August we found a home (it only took looking at 31 other houses to find it), we registered the kids for school, my husband started to settle in at his new job, and we waited to close on our house. In September we closed on our new home and our household goods were delivered. I remember asking my husband then when he thought things would get "back to normal". After Christmas he said. After Christmas! I really thought he was kidding. I mean, there was no way it was going to take me that long to get things "back to normal". I'm an organized person. Surely he is mistaken I thought. Well, it's after Christmas and you know what? He was right. Absolutely, 100% right! There, I said it. I finally feel that we are back in a routine and things are relatively settled. We are still dealing with making the garage and shed "work" but the rest of the rooms are functioning, the holidays are packed away, and now we're working on making the house "ours". Of course Pinterest has filled my mind with images of hand made farm house tables and beautifully refinished kitchen cabinets but I'm in no rush. Well, maybe I am, but life tends to slow me down whether I like it or not. What is finally clear is that I have time to work. Create new designs. Craft. Sew. And today, get back to writing I Made it Monday posts. You won't be surprised to know that many will have a home renovation/decorating theme but I'll be sure to include crafting and sewing as well, just not today.


My Photo Gallery Wall

We've all seen them on Pinterest. Beautiful collections of photos and portraits in eclectic or matching frames, all perfectly aligned in straight rows or columns and occasionally even randomly arranged. If you're looking for absolute symmetry this isn't the post for you. It's just not what I was going for. I was really aiming for more of a "feeling" and not for perfection and it was easier to achieve than I expected.

Here's what I did ... With three daughters you can imagine that I have a lot of pictures and photos. What I also had was a lot of random picture frames. What I don't have is a picture of this part but it's easy to comprehend. If you want your picture frames to all be the same color don't go out and buy new ones. Spray paint the frames. Yes, spray paint. The crafter's best friend. I took off the backs and removed the glass in all of my frames, went outside and, you guessed it, spray painted them. They all got a nice coat of black then I did it again, because spray paint is even better with a second coat. After they were all dry and reassembled I worked on deciding how I wanted to arrange them. I knew that I wanted our 20th anniversary subway art (is it really subway art?) as the center but the rest I played with. I didn't want complete symmetry, just balance, if that makes any sense. I laid them out on the floor and just played around. When I was happy with the arrangement my husband helped me hang them on the wall. As you can tell they aren't evenly spaced. Generally they are between 2.5 to 3 inches apart but that really is "general". The only even line is the bottom line and that's because I didn't want anyone accidentally bumping into them when they were sitting on the couch. The trick to keeping them level once you've finished hanging them is Command Picture Hanging Strips. I don't have the guts to use them to actually hang my pictures but I am more than willing to use them to keep a picture in place. I don't put them on each corner, usually just one is enough to keep a picture from swinging every time someone slams a door. As a whole the project wasn't difficult at all, just a little time consuming, and the effect is exactly what I wanted. Balanced but not symmetrical and for heaven's sake, no particular child highlighted more than the other. What do you think? Have you tried something similar or have another idea? I have more pictures and more rooms so I can always use some inspiration.


I cannot tell you how difficult it was to get a picture straight on that was anything more than a giant "flash" from the reflection of the camera flash in the glass of the pictures or a reflection of the natural light from the windows directly across from the couch, hence this poorly lit, what is all that glare, no flash picture.

A relatively glare free side angle to help you see just how unsymmetrical things really are. The distortion of the picture makes a few frames seems as if they aren't level although they don't appear that way in real life.

My secret way to keep pictures level. 


Be sure to follow me on Pinterest, as well as Facebook, and find my designs at Applique Time. Check back next week to see my next I Made it Monday post. I'll tell you now, it has something to do with The 12 Days of Christmas and over 800 "feathers". 

Regards,
Bridgette

Thursday, February 2, 2012

Green Beans Cans part II

I'll admit it. We like canned green beans. I like fresh green beans too (especially grilled) but canned green beans are a bit of a staple around our house. Last year for my birthday I asked for new cookie sheets and a safe edge can opener. (I know, kitchen equipment, really?) Boy has that can opener done wonders for my crafting. Do you have any idea the places you can use empty cans? I have a bit of a habit of spray painting them to match parties and using them to hold plastic spoons and forks, I used one turned upside down to prop up my phone charger so it didn't get lost at the back of the counter and my newest use was yesterday's Wordless Wednesday. I spray painted 2 to match my daughters room, used some 3m command strips made for hanging pics, and hung them by her desk to hold markers and colored pencils. It frees up some of the space on her desk and she can take the can down when she needs to. The very next day she took the cans down to go outside to color at her picnic table and enjoy the warmer than average temps and then just hung them back up when she was finished. It was as easy as I had hoped it would be. Who knew an empty can could be so versatile?


Sunday, January 29, 2012

An Easy Way to Display Artwork

5 year old? Check.
Constant stream of completed worksheets from school? Check.
Seemingly never ending stacks of the finest 5 year old artwork? Check.
A place to display said worksheets and artwork that doesn't involve taping them to a door or hanging them from the fridge? Check, check, check!


Here's how ...


All you need is an inexpensive cafe rod and some drapery rings. I already had a cafe rod on hand but it was white with gold trim. Since black is the new black around my house I spray painted the rod and hanging hardware first. I picked up a few packs of curtain clip rings, slipped them on the rod before I hung it (be sure to use the center support if you are making it super long) and was ready to display our beautiful works of art. Now, each day I just replace the oldest with something new. The display is ever changing, always represents the season or holiday and since ours is in the dining room we have a conversation starter for dinner every night. Plus the entire project cost less than $20. 


Have your own artist and want to make something special for them? Then you need this free painter's palette applique design


If you're the type that reads blogs (psst, that's you) please consider following me. Comments are always welcome too! I would love to hear about the creative ways that you plan to use the design and how you might be using your own artwork display in your home too.


Blessings,
Bridgette


Thursday, December 1, 2011

A "Newer" Wreath

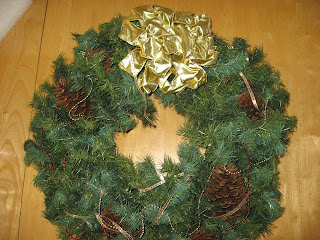
Is it December already?  Did I really post only once in November?  Oops!  That wasn't what I had in mind. Nevertheless, December is upon us now and if you haven't already started decorating for Christmas well ... let's just say I'm not going to judge you.  Last year just decorating the tree seemed like a chore and we didn't get it finished until the 11th of December.  This year is different and somehow (maybe it's the fact that all of the kids are in school now) we seem to be on top of things.  So much so that when my middle daughter brought me the wreath to "fluff" yet again I decided I was going to do something new with it.  You see, this wreath, and all of its trimmings, has been in the family for 12 years now.  Each year my husband unpacks it from the buckets of decorations and lovingly calls to me to give it a little TLC before hanging it on the door.  Some years I even take everything off and completely "redo" it.  Well, not this year!  I took a few minutes (read hours) of my evening Saturday and perused Pinterest for new wreath ideas and decided to add our surname initial to it.  The problem was I didn't have a 12 inch "W" lying around so off to the craft store I went.  Here are the details of how this came together and a before picture ...


Supplies:
a wreath (like I said, this one has been around a while)
sheet of Styrofoam (I purchased mine at Joann's.  It was about an inch thick and probably 11x14)
marker
knife
newspaper
30 gauge wire (or whatever you have around the house as long as it isn't too thick)
glitter (I bought an 8oz bottle and almost used 1/4 of it)
spray paint the same color as the glitter
clear drying school glue (I used almost 2 4oz bottles)
a paint brush (the wider the better)
a bowl to pour the glue into
ribbon or something to hang the wreath

I knew what I wanted my letter "W" to look like.  Being an applique person I am very familiar with lots of fonts especially the curlz font.  I really wanted something with a little whimsy but clear enough to be distinguishable from the road.  Using the marker I drew my "W" on my Styrofoam.  (Did you know Styrofoam is a brand?  Kinda like Q-tip.)  I wasn't worried about getting it perfect because it would be covered anyway.  If you're having trouble picturing your letter just head to your computer and look at a few fonts online.


Next I went outside and cut the letter out using a knife.  I found it easiest to score it first and then go back and cut through.  


I cut 4 long pieces of wire.  I wanted them long enough to wedge into the Styrofoam and have plenty of length to tie the finished letter to the wreath.  I just kinda cut the wire into the foam on each end.  Kinda like it was cutting into it but not through it.  Just wedged in there.  I guess I should have tried a little harder to get a pic of this because describing it isn't coming so easy.

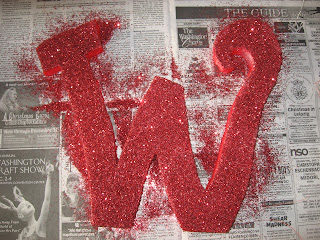
After that I went outside to spray paint my "W" red.  I wanted to do this so in the event that I wasn't generous with my glitter the white wouldn't show through.  The wire did come in handy tying the letter to the volleyball net tie down.  If you look really close and are younger than 40 you might be able to see the wire "wedged" in there.  

This picture brought to you by the letter W.

After the paint dried next came the glitter.  I poured the glue into a small bowl to make it easier to use the paint brush.  I brushed some glue on then generously applied the glitter and just worked my way around a little glue and a lot of glitter at a time.  This took a while because I had to wait for sections to dry so I could turn it around to get to other spots like the sides and top.  I really had to resist the urge to move on while the glue was drying.  


I don't know if it was because I was liberal with the glitter or because of the spray paint but 1 coat of glitter was plenty.  The next morning I did apply a second layer of glue over the glitter.  I wanted the top coat to be glue not glitter and since I was using school glue that dried clear this was no problem.  (You may be able to see the wire here also as well as a complimentary viewing of the Arts section of the Washington Post.)  


After waiting most of the day for the glue to dry I was able to use the attached wire and secure my 12 inch "W" to my wreath that evening and hang it up on the front door.  I am very pleased with the appearance both up close and far away.  I have to admit, there was a time early on in the glittering that I was worried that it might look a little thrown together but once I got a nice layer of glitter on it and put it together I'm very happy with the outcome.    


How about you?  Do you have a great wreath makeover to share?