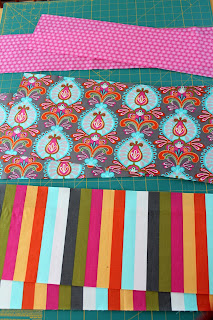
You will need ...
waist band fabric, 3/8 yard
main fabric, for most this will be 5/8 yard or less depending on the desired length (for a 15" length I was able to use exactly 1/2 yard)
contrast fabric, 1/2 yard
measuring tape
scissors
rotary cutter and cutting mat (don't worry if you don't have them, it just makes things easier)
thread
7/8 inch elastic although I often use 1/2 inch if that's what I have on hand
You will need two measurements. The child's waist and the desired length. If you're unsure about what the length should be try measuring something in her closet that is the length you're looking for. My daughter is a skinny little thing and has a 23 1/2" waist and although she has grown a lot I only want her skirt to be about 15" long. She likes to pull her skirts down on her hips so if I make it longer it will be past her knees. I've spent a lot of time over the last year pulling her skirts up only to have her pull them back down. Now it's time to just sew them the way that works for us both.
Now, the simple math.
Waist Band Fabric
Cut 2 pieces the width of the waist x 5 1/4" long. This will ultimately yield a waist band that is approximately 3 1/4" wide. For me, I will cut 2 pieces that are each 23 1/2" x 5 1/4".
If you are making a skirt for a waist 20" or smaller you can cut 1 piece on the fold.
Main fabric
Here is that one math problem I mentioned. Prepare yourself. Subtract 6" from your overall desired length. For me that will be 9" (15 minus 6). We will call this your adjusted length. That wasn't so bad was it?
Cut 2 pieces the width of the waist and the adjusted length. Again for me, that will be 2 pieces that are each 23 1/2" x 9".
Remember, if you are making a skirt for a waist 20" or smaller just cut 1 piece on the fold.
Contrast fabric
Cut 2 pieces the width of the waist x 7 3/4" long. This will ultimately yield a contrast band that is approximately 3 1/2" wide. This means I will have 2 pieces, each 23 1/2" x 7 3/4".
And still, if you are making a skirt for a waist 20" or smaller you can cut 1 piece on the fold.
That's it for the cutting and the math. At this point you should have 6 pieces (3 for 20" waist or smaller). Now it's time to sew a few straight lines. For all seams the allowance is 3/8".
Waist fabric
With right sides together sew each side seam. I prefer to overcast mine when I am finished since I don't have a serger. If you are working with a smaller waist and cut 1 piece on the fold you only have 1 side seam to sew.
Main fabric
With rights sides together sew each side seam. Overcast or serge if desired. If you are working with a smaller waist you only have 1 side seam here too.
Contrast fabric
With right sides together sew each side seam. Do NOT overcast or serge these seams. They will need to lie flat in a few minutes. If you are working with a smaller waist you still only have 1 side seam here as well.
 |
| Notice that the contrast fabric is not overcast but the main and waist fabrics are. |
So far we have worked from the top down. Now I like to work from the bottom up.
Next we are going to attach the contrast band to the main fabric.
Begin by pinning the contrast band to the bottom on the main band, right sides together starting with matching the side seams. If you are using directional fabrics be sure to check and make sure they are going to be facing the right direction before you sew. Once you've checked go ahead and sew the two fabrics together. I prefer to overcast here as well.
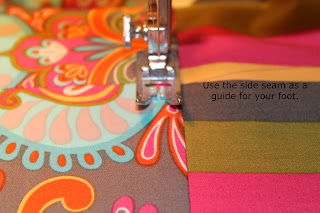
Next, iron open with the inseam up. On the right side, using the seam as a guide, sew along to tack the inseam up. If you wanted to add ric rac this is a great place to do so.
Now it's time to attach the waist fabric to the main fabric.
Begin by pinning the waist fabric to the main fabric right sides together. It's a good idea to check directional fabric here also. Now sew and if you prefer overcast the seam here as well.
Next, iron open with the inseam down this time. This is a personal preference for me. If you want to iron the inseam pointing up here you certainly can. My little princess can some times get fussy over tags and things on her skin so I iron it down in hopes that it is less likely to rub her the wrong way. On the right side, using the seam as a guide again, sew along to tack the inseam whichever direction you prefer. The picture shows me sewing it with the inseam down.
The only thing left to do is create the casing for the waist and insert the elastic. You'll be finished in no time.
When creating a casing I always like to overcast the raw edge before I start. I don't know why. I'm sure I saw it or read it somewhere. You don't have to. I doubt anything would really happen if you didn't but I do.
Next, I press under approximately 3/8" of the raw edge and then another 1 1/4" to create the casing.
Sew close to the lower edge of the casing leaving an opening to insert the elastic.
Using a safety pin (because that's how my mom taught me) I then insert the elastic through the casing. I typically start with my waist measurement plus 1" for the elastic length. Once the elastic is through I pin the elastic ends together (maybe this is why I start with a safety pin) and try the skirt on. Of course the elastic always needs to be adjusted but that is simple. After adjusting the fit I sew the elastic together, distribute the fullness, and stitch the opening close (which I forgot to take a picture of).
I also make a habit of stitching in the ditch on the side seams to try to keep the elastic from shifting or twisting.
Now the only thing, and I do mean only thing, left to do is admire your work. You're finished! You made a super cute skirt using three different fabrics and hopefully had a little fun.
A few housekeeping items ...
The fabrics used are from Windham Fabrics Cabana Blooms collection and I purchased it from my favorite fabric shop, Material Girls Quilt Boutique in La Plata, Maryland.
The applique design used on the shirt is actually the frame from my Scalloped Bunny design. I skipped the bunny steps and merged in a capital H from 8 Claws and a Paw's Candi font.
The shirt is from ARB Blanks. This was the first time that I used their shirts. They ship unbelievably quickly and the shirts are a very nice quality. I do think they have a trim, feminine fit (the girls at least) which is fine as long as you are paying attention to the size chart when ordering.
I did make the headband from a combination of patterns and tutorials. I'll work on a tutorial for that another day so check back soon.
Thanks for reading!
Blessings,
Bridgette


