Monday, January 25, 2016

I Made it Monday Hugs & Kisses Valentine Decoration

I Made it Monday

Join me on my ongoing quest to share tips, tricks, projects, and recipes along with just about anything else on I Made it Monday.

Hugs & Kisses Valentine Decoration

This weekend my youngest daughter and I set out to make a Valentine craft. By this I mean, I desperately wanted to pull her away from her electronics in a way that wasn't so obvious to her by making a cute Valentine decoration together. I also got in a tiny little Mom "win" since I was able to save the obvious "that's enough electronics today" for later that evening.

Supplies
Dollar store or clearance picture frames
Decorative or solid craft paper
Vinyl cutter (I have a Silhouette Cameo) or Printer
Vinyl if needed
Scissors
Ribbon if you so choose

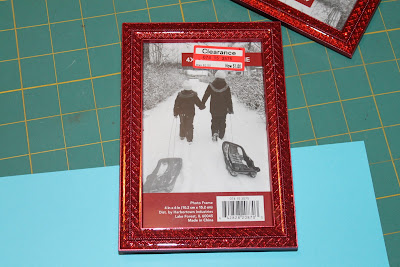
I bought three of these picture frames on clearance at Target just after Christmas. I'm sure that they were intended for Christmas but the sparkly red said Valentines to me. At only $1 each I really couldn't pass them up. If you can't find clearance picture frames you can always check the dollar store. I think black frames would be just as cute with a red, white, and pink color scheme for the paper and vinyl.


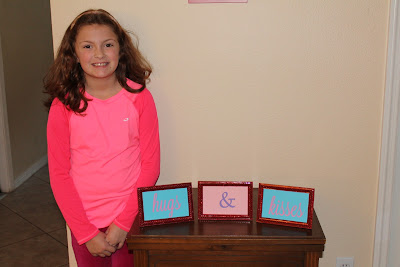
We were trying very hard to work with what we had on hand. I didn't have enough of the blue paper or pink for all of the frame so we decided to have two with blue and one with pink. This also allowed for two different colors of words so I didn't mind. We were having a hard time deciding colors anyway. I cut the paper to fit inside the frame and my daughter put them together. For some reason she was really excited to do that part. After that we sat down to create the words in Silhouette Studio and cut them in vinyl. If you don't have a vinyl cutter don't be discouraged. You could print the words on your paper from your computer. Just play around with some fonts and see what you like, then print it out on your chosen paper. Vinyl is just an option. I would suggest printing it out first then cutting your paper to fit inside the frame. This will probably take a little more planning to decide where the placement of the word should be on the paper but I know you can handle it.


For our frames the paper is behind the glass but the vinyl is on the outside. I do wish that I had put the word "kisses" a little higher but not enough that I was going to cut more vinyl and start over. I'm already thinking I may do it again, next year of course, with a different font. I was looking for a romantic, cursive font, but I'm already thinking chunky and fun for next year. Luckily the frames were inexpensive and are easy to change. Don't be surprised if you see these resurface with white and blue for 4th of July, and maybe green during Christmas. Don't you love a versatile craft project?


You could use ribbon to attach the frames to one another and make a vertical wall hanging or just to add little bows to the frames. We chose to display them as they are on a table in the foyer. I like the idea of a wall hanging but for some reason I already have a lot of Valentine wall decorations.


We're working on a few other decorations to add to the table so the frames don't look so lonely. Right now my silly daughter likes to rearrange them to say Kisses and Hugs when I'm not looking.

Do you have a versatile way to craft with picture frames? 

Be sure to follow me on Pinterest, as well as Facebook, and find my designs at Applique Time. Check back next week to see my next I Made it Monday post. 

Regards,
Bridgette 

Monday, January 18, 2016

I Made it Monday Twelve Days of Christmas Turtle Doves and Geese Costumes

I Made it Monday

Two weeks in a row. It's almost a record. 


Two Turtle Doves and Six Geese a Laying

Boy oh boy, did I do it this time. Without any prompting I mentioned to the music teacher at my daughter's school that I could sew. That's right, I let the cat right out of the bag. I emailed her some pictures that I took at a performance and when she replied to thank me I kindly replied back that she was welcome and oh, by the way, I can sew. I could almost see her reaction by how quickly she replied back to confirm what was said. Sew? Like on a machine? Yep, that's when I knew she was going to keep me busy. When I told my husband at dinner that night I thought he was going to die of laughter. Why would I do that? What was I thinking? Did I have any idea what I was getting into? And the answer is, yes, I absolutely did. I mean, I didn't know what would be asked of me, but I do know that my daughter absolutely loves being able to say, "My Mommy made that," and I love to hear it when she does. I also love it when the other students thank me or ask questions or give their input. I grew up in a sewing family so I sometimes forget that many kids have no exposure to sewing at all and I like to share my craft. A few weeks went by and you guessed it, an email came asking for simple 12 Days of Christmas props for turtle doves and geese. The rules were that there be no headpieces and that it be easy to put on and off between songs. Here's what I did.

After searching Pinterest and Google I found a few tutorials for bird wings. I didn't do a very good job of photographing the process (read, I didn't take any pictures) but it wasn't that hard either. My biggest source of reference was another blog post by Natasha Jane over at NattyJaneSews. Her tutorial is written in four parts that are linked below. I tried laying my feathers out in the curving pattern that she shows but decided to go with just horizontal lines. Not only did this save time but it also saved materials and was perfect for my wings intended purpose. To prevent fraying but keep the wings lightweight I used a very lightweight iron on stabilizer on my feather fabric. I admit, this did add an extra step, but I didn't want to use felt or any other non-fraying fabric. Not only would it be heavy but it tends to be pretty expensive too. I also had help. My high school senior needed volunteer hours for National Honor Society and was able to use the hours that she spent helping me (she cut all 800+ feathers) toward her volunteer time since it was for a local elementary school.


No two sets are alike but each set is symmetrical. I used a combination of black, gray, silver and white for the geese.

For the two turtle doves I used a mixture of white and silver. 
 
All eight magnificent sets.


I can't say that I would jump at the chance of making eight sets of wings again but I do look forward to helping with the spring musical, whatever that means.

Be sure to follow me on Pinterest, as well as Facebook, and find my designs at Applique Time. Check back next week to see my next I Made it Monday post. 

Regards,
Bridgette

Natty Jane Sews Tutorial Step One 

Natty Jane Sews Tutorial Step Two

Natty Jane Sews Tutorial Step Three

Natty Jane Sews Tutorial Step Four 

Monday, January 11, 2016

I Made it Monday My Photo Gallery Wall

I Made it Monday


Early last summer I got a crazy idea to start posting regularly on Monday's at the least. I actually didn't just get the idea then, I had been toying with it for a while. I had big dreams of highlighting all kinds of projects that "I made!" every Monday. Sewing projects, craft projects, recipes, whatever I could think of. Well, around the same time that I made this grand plan we also made a grand plan as a family for my husband to change employers and my family to move over 850 miles and six states away. Well thought out, I know. It's a talent. My desire to regularly post on Monday's quickly went out the window because there isn't much to share when you're living in temporary housing, your entire household is in storage, and you spend your days looking at houses. Well, I guess there is, but it wasn't exactly what I had in mind. As quickly as my plan started it came to a screeching halt. In August we found a home (it only took looking at 31 other houses to find it), we registered the kids for school, my husband started to settle in at his new job, and we waited to close on our house. In September we closed on our new home and our household goods were delivered. I remember asking my husband then when he thought things would get "back to normal". After Christmas he said. After Christmas! I really thought he was kidding. I mean, there was no way it was going to take me that long to get things "back to normal". I'm an organized person. Surely he is mistaken I thought. Well, it's after Christmas and you know what? He was right. Absolutely, 100% right! There, I said it. I finally feel that we are back in a routine and things are relatively settled. We are still dealing with making the garage and shed "work" but the rest of the rooms are functioning, the holidays are packed away, and now we're working on making the house "ours". Of course Pinterest has filled my mind with images of hand made farm house tables and beautifully refinished kitchen cabinets but I'm in no rush. Well, maybe I am, but life tends to slow me down whether I like it or not. What is finally clear is that I have time to work. Create new designs. Craft. Sew. And today, get back to writing I Made it Monday posts. You won't be surprised to know that many will have a home renovation/decorating theme but I'll be sure to include crafting and sewing as well, just not today.


My Photo Gallery Wall

We've all seen them on Pinterest. Beautiful collections of photos and portraits in eclectic or matching frames, all perfectly aligned in straight rows or columns and occasionally even randomly arranged. If you're looking for absolute symmetry this isn't the post for you. It's just not what I was going for. I was really aiming for more of a "feeling" and not for perfection and it was easier to achieve than I expected.

Here's what I did ... With three daughters you can imagine that I have a lot of pictures and photos. What I also had was a lot of random picture frames. What I don't have is a picture of this part but it's easy to comprehend. If you want your picture frames to all be the same color don't go out and buy new ones. Spray paint the frames. Yes, spray paint. The crafter's best friend. I took off the backs and removed the glass in all of my frames, went outside and, you guessed it, spray painted them. They all got a nice coat of black then I did it again, because spray paint is even better with a second coat. After they were all dry and reassembled I worked on deciding how I wanted to arrange them. I knew that I wanted our 20th anniversary subway art (is it really subway art?) as the center but the rest I played with. I didn't want complete symmetry, just balance, if that makes any sense. I laid them out on the floor and just played around. When I was happy with the arrangement my husband helped me hang them on the wall. As you can tell they aren't evenly spaced. Generally they are between 2.5 to 3 inches apart but that really is "general". The only even line is the bottom line and that's because I didn't want anyone accidentally bumping into them when they were sitting on the couch. The trick to keeping them level once you've finished hanging them is Command Picture Hanging Strips. I don't have the guts to use them to actually hang my pictures but I am more than willing to use them to keep a picture in place. I don't put them on each corner, usually just one is enough to keep a picture from swinging every time someone slams a door. As a whole the project wasn't difficult at all, just a little time consuming, and the effect is exactly what I wanted. Balanced but not symmetrical and for heaven's sake, no particular child highlighted more than the other. What do you think? Have you tried something similar or have another idea? I have more pictures and more rooms so I can always use some inspiration.


I cannot tell you how difficult it was to get a picture straight on that was anything more than a giant "flash" from the reflection of the camera flash in the glass of the pictures or a reflection of the natural light from the windows directly across from the couch, hence this poorly lit, what is all that glare, no flash picture.

A relatively glare free side angle to help you see just how unsymmetrical things really are. The distortion of the picture makes a few frames seems as if they aren't level although they don't appear that way in real life.

My secret way to keep pictures level. 


Be sure to follow me on Pinterest, as well as Facebook, and find my designs at Applique Time. Check back next week to see my next I Made it Monday post. I'll tell you now, it has something to do with The 12 Days of Christmas and over 800 "feathers". 

Regards,
Bridgette